 Save to Pinterest
 I still remember the first time I created a dessert platter that made everyone at the table stop and stare before even tasting anything. It was a dinner party I'd been anxious about, and instead of stressing over a single perfect dessert, I decided to arrange a symphony of flavors and textures on one stunning board. The moment my guests saw that cascade of chocolates, jewel-toned berries, and delicate pastries arranged in perfect symmetry, I watched their faces light up. That's when I realized that sometimes the most impressive dessert isn't about complexity—it's about bringing together things we already love and presenting them with intention and care.
I'll never forget serving this platter at my sister's engagement party. She'd always said she wasn't a sweets person, but watching her reach for the chocolate-covered almonds, then the raspberries, then a macaron—seeing her discover new combinations right there at the table—that's when I understood the real magic of this dessert. It wasn't about being the fanciest thing on the spread. It was about creating a moment where everyone could slow down, taste intentionally, and enjoy together.
Ingredients
- Strawberries, halved (1 cup): Their bright red is your visual anchor—they're the color that makes everything else on the board pop. Choose ones that are firm and fragrant; soft berries will weep and muddy your arrangement
- Blueberries (1 cup): These little gems stay perfectly dry and don't stain, making them ideal for filling in small gaps between the showier elements
- Raspberries (1 cup): Delicate and precious, add these last to prevent bruising. They're your luxury touch, the ingredient that says you care about details
- Kiwis, peeled and sliced (2): The jewel-green interior provides a sophisticated color contrast that makes the warm berries sing
- Mango, peeled and cubed (1): Its golden sweetness bridges the gap between the tartness of berries and the richness of chocolate
- Assorted truffles (1 cup): These are your flavor anchors—choose varieties with visual variety, from dark to milk to even white chocolate. They give gravitas to the board
- Chocolate-covered almonds (1 cup): The texture matters here; they keep their crunch and provide a satisfying contrast to soft berries
- Mini brownies or brownie bites (1 cup): Homemade is ideal if you have time, but high-quality store-bought works beautifully too. They're the grounding element, the comfort in your sophistication
- Assorted macarons (1 cup): These jewel-toned French cookies feel fancy but do the heavy lifting of looking elegant with minimal effort. Let them sit at room temperature before serving so they have that gentle chew
- Shortbread or butter cookies (1 cup): The humble hero that fills spaces and works with every other element. Their subtle sweetness won't compete
- Dark chocolate chips, for melting (1 cup): Use high-quality chocolate here—at least 70% cacao. The better the chocolate, the more luxurious that final drizzle feels
- White chocolate chips, for melting (1/2 cup): The contrast between dark and white chocolate is what creates visual drama. Choose real white chocolate if possible, not the waxy imitation
- Chopped pistachios (2 tablespoons): Their vibrant green and subtle saltiness add an unexpected sophistication. Toast them lightly for deeper flavor
- Dried rose petals, optional (2 tablespoons): The detail that makes people ask, "Did you really make this?" They're optional but worth it for special occasions
- Fresh mint leaves: The final green note that says this is intentional and fresh, not just thrown together
Tired of Takeout? 🥡
Get 10 meals you can make faster than delivery arrives. Seriously.
One email. No spam. Unsubscribe anytime.
Instructions
- Set up your canvas:
- Lay out your large platter or board on a clean, level surface where you'll be working. Take a moment to really look at its shape and size—this is the stage for your edible art. If it's white, your colorful fruits and pastries will sing. If it's wood, you're creating rustic elegance. Know your stage before you start filling it.
- Prep everything, arrange nothing yet:
- Wash and thoroughly dry all your fruits—this is non-negotiable. Any moisture will cause chocolate to seize and berries to look sad and soggy. As you dry each piece, halve the strawberries, slice the kiwis into half-moons, and cube your mango into uniform pieces. Keep the berries whole. Lay everything out on a clean kitchen towel in small piles. You're not arranging yet, just getting ready. This is where the magic begins—seeing all your beautiful components in one place.
- Melt your chocolate with patience:
- Pour dark and white chocolate chips into separate microwave-safe bowls. Here's what I learned the hard way: chocolate burns faster than you think. Microwave each in 30-second bursts, stirring between each one. You'll feel the heat from the bowl increase, and the chips will start looking glossy before they're fully melted. That's when you stop and stir—don't wait for it to be completely liquid from the microwave alone. The residual heat will finish the job, and you'll have silky, glossy chocolate instead of grainy, broken chocolate.
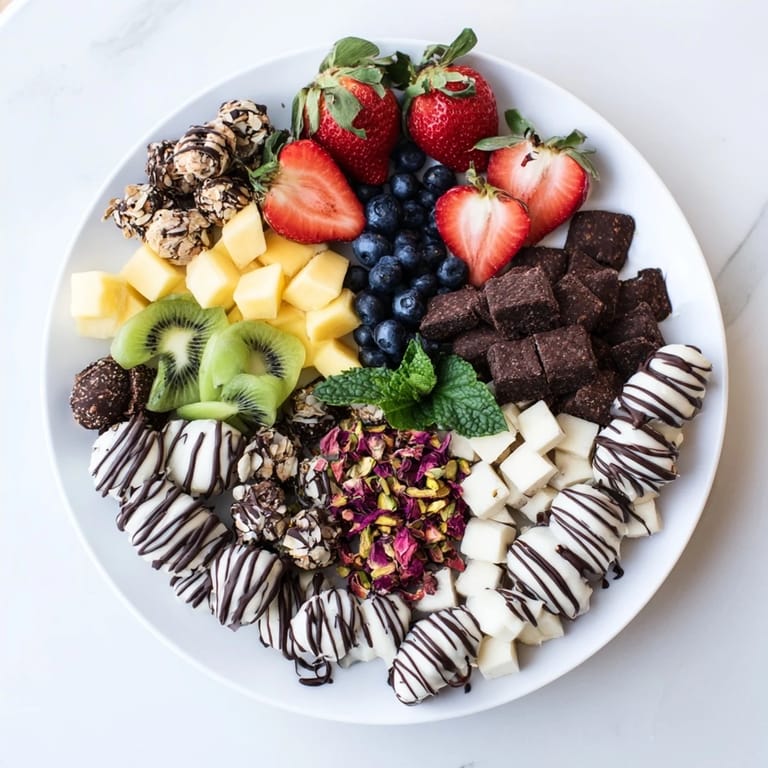
- Begin with balance and symmetry:
- This is where you become an artist. Start with your largest elements first. Place fruits in symmetrical patterns on opposite sides of your board—strawberries on the left, kiwis on the right, raspberries in an arc across the top. Stand back and look at your board like a painter looks at a canvas. You're creating balance, not filling space.
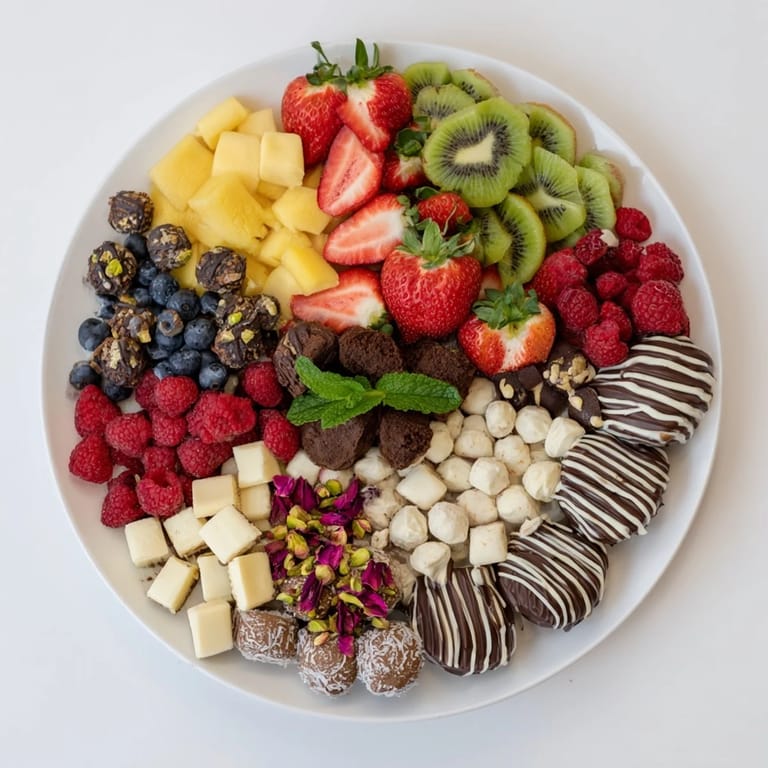
- Layer in the luxuries:
- Now place your truffles in neat rows or scattered circles, alternating colors. Tuck the macarons into spaces where they can lean against each other like friends gathered together. Position your brownies in a line or cluster. This is where the board goes from pretty to "Oh, wow." You're showing that you put thought into placement.
- Fill the gaps thoughtfully:
- Slide cookies, chocolate-covered almonds, and any remaining sweets into the spaces between your main elements. Don't just fill randomly—look for places where colors complement each other. A pale shortbread next to a dark truffle, a macaron tucked beside a cluster of berries. You're not done when every space is filled; you're done when it looks intentional.
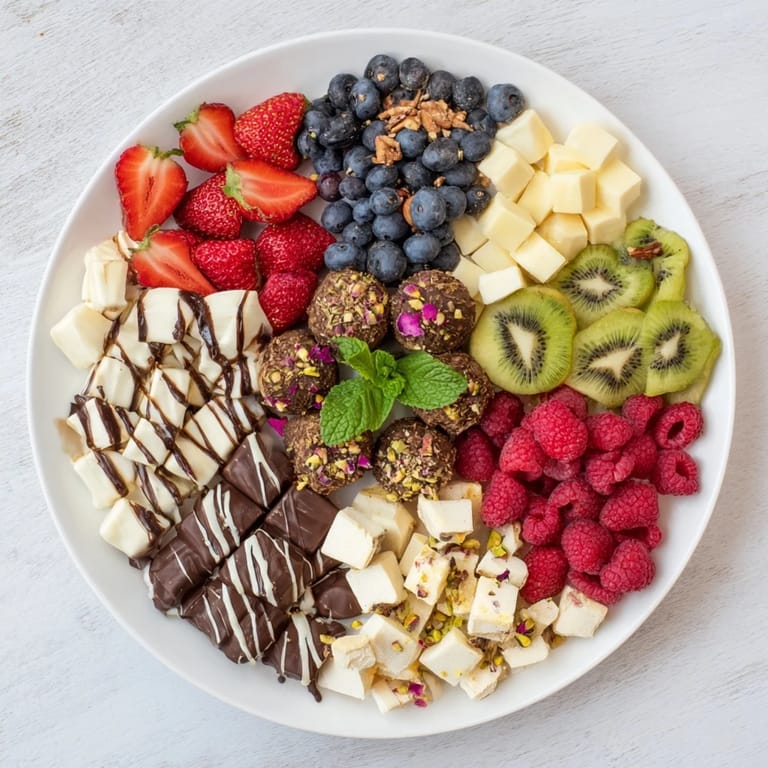
- Drizzle with intention:
- This is the flourish that transforms your board from "nice" to "stunning." Using a spoon or piping bag, drizzle dark chocolate in thin, loose lines across the board—think less "neat" and more "artistic." Now do the same with white chocolate, creating contrast. The key is not to overthink it. Three or four deliberate drizzles on each side looks polished. Over-drizzling looks rushed.
- Finish with sparkle and fragrance:
- Sprinkle your chopped pistachios across the board, letting some land on the fruit, some on the pastries. Add your dried rose petals if using them—they're subtle but unmistakably special. Finally, tuck fresh mint leaves into spaces and over the top. Step back. Your board is finished.
 Save to Pinterest
 There was this moment at a wedding where a friend turned to me mid-bite of a macaron and said, "I didn't know I could taste joy." That's what this platter does—it's not just dessert, it's a moment of permission to slow down and savor, to try things you might not normally reach for, to enjoy in community rather than alone. That's when food becomes memory.
Creating Your Color Story
The secret to a dessert platter that photographs beautifully isn't complicated—it's about understanding that colors speak a language all their own. Deep burgundy raspberries against jewel-green kiwi create contrast that makes your eye want to explore. Pale macarons next to dark chocolate feel both luxurious and approachable. Think of yourself as a painter. Are you creating a sunset board with oranges and deep reds? A garden board with greens and berry tones? Once you understand your color story, arranging becomes intuitive instead of stressful. The colors will guide you.
Making It Your Own
This is where my initial anxiety about perfection completely dissolved. You don't have to follow anyone's formula exactly—not even mine. Prefer grapes to raspberries? Use them. Love candied nuts more than plain ones? Swap them in. Have guests with nut allergies? Build your board around what they can eat, and it becomes even more thoughtful. The magic isn't in following every step perfectly; it's in creating something beautiful from what you have and what you love. That's what makes a platter feel personal instead of prescribed.
- Gluten-free or dietary needs? Swap cookies and brownies for versions that work for your guests, and nobody loses out on elegance
- Seasonal swaps make sense too—fresh berries in summer, pomegranate arils and pears in fall, candied citrus in winter
- If you're nervous about chocolate drizzling, practice on a piece of parchment first until your hand feels confident
The Art of Strategic Timing
I used to think I had to assemble everything right before guests arrived, which meant I was stressed and frazzled at the exact moment I wanted to be welcoming. Now I prep everything earlier in the day, keep components in separate containers, and do the final arrangement an hour before people arrive. It feels less like rushing and more like a final creative act. Your chocolate can be melted ahead and gently warmed right before serving. Your fruits can be prepped hours in advance and kept under a cloth. Only the final drizzle and mint garnish should happen fresh. This is actually easier than it looks, and you get to serve it with calm and grace instead of breathlessness.
 Save to Pinterest
 Creating a dessert platter is one of those rare kitchen moments where you're not really cooking—you're curating, creating, caring. Every time you serve one, you're saying to the people at your table, "You matter enough for me to think about beauty and delight." That's the real recipe.
Recipe FAQs
- → How do I achieve the symmetrical arrangement?
Arrange fruits and sweets in mirrored or alternating patterns on the board, starting from the center and working outward to maintain balance.
- → What is the best method to melt the chocolates?
Use a microwave in 30-second intervals, stirring between each, or a double boiler to ensure smooth, lump-free melted chocolate.
- → Can I substitute nuts for allergies?
Yes, omit pistachios or replace them with safe alternatives like seeds or skip them entirely for nut allergies.
- → How to keep the fruits fresh and vibrant?
Wash and fully dry fruits before slicing and arranging. Serve promptly or refrigerate to maintain freshness.
- → What types of sweets complement the fresh fruits best?
Combining truffles, macarons, mini brownies, and chocolate-covered nuts adds variety in texture and sweetness, creating harmony with fresh fruits.