 Save to Pinterest
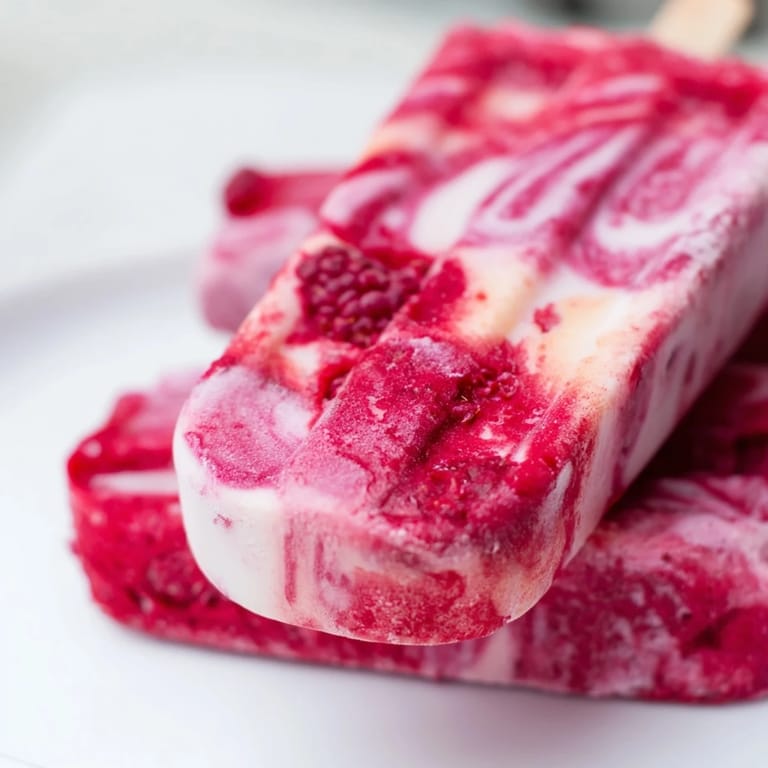
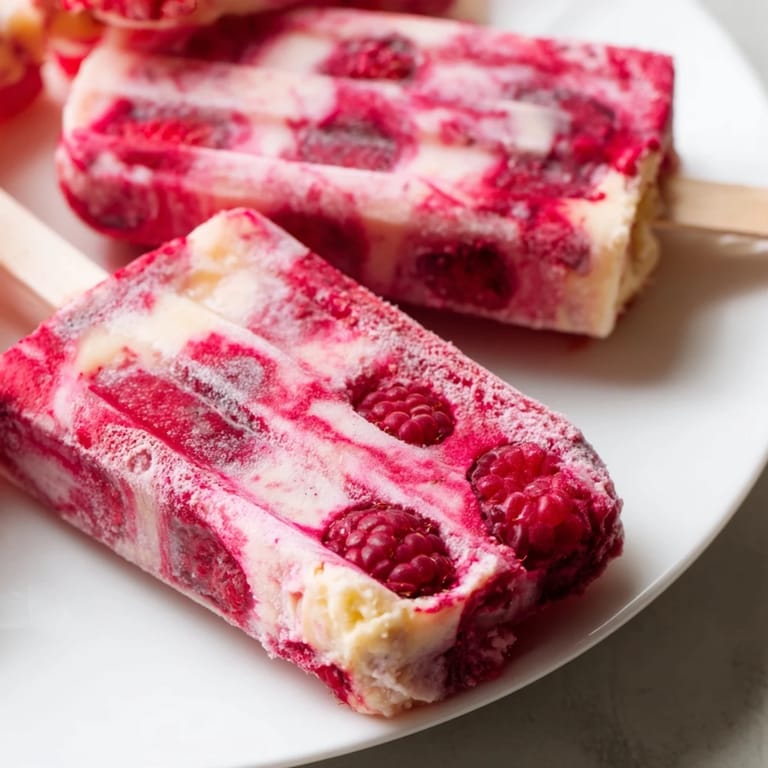
 My neighbor brought over a tray of these on a sweltering afternoon, and I watched them disappear in minutes—the kids couldn't get enough of the pink and white swirls. When she casually mentioned they were vegan and took barely ten minutes to prep, I was skeptical until I made them myself the next day. Now they're my go-to when the heat makes cooking feel impossible, and honestly, they're beautiful enough that people think you fussed over them.
I made a batch one Fourth of July for a potluck, and someone actually asked for the recipe before they'd finished eating theirs—which never happens at our gatherings. I loved that moment when a homemade frozen treat earned the same excitement as the elaborate dishes people had labored over all morning.
Ingredients
- Fresh or frozen raspberries (2 cups): Use frozen if they're what you have on hand—they blend into an even silkier puree and cost less than fresh.
- Honey or maple syrup (4 tablespoons total, divided): Maple syrup keeps these fully vegan; honey adds a subtle floral note if you're not strict about it.
- Lemon juice (1 tablespoon): This is what stops the raspberries from tasting flat and gives them a little snap.
- Full-fat coconut milk (1 can, 400 ml): Don't use lite—the cream layer needs that richness or you'll taste the difference.
- Pure vanilla extract (1 teaspoon): A small amount transforms the coconut layer from plain to subtle and inviting.
- Salt (a pinch): This tiny amount brings out sweetness in unexpected ways.
Tired of Takeout? 🥡
Get 10 meals you can make faster than delivery arrives. Seriously.
One email. No spam. Unsubscribe anytime.
Instructions
- Blend the raspberry layer:
- Combine the raspberries, two tablespoons of sweetener, and lemon juice in your blender and process until completely smooth—you want no little seeds catching on your tongue. Taste it now, and if it tastes a bit sharper than you'd eat straight, that's actually perfect because freezing dulls sweetness slightly.
- Prepare the coconut layer:
- Whisk the full-fat coconut milk, two tablespoons of sweetener, vanilla, and salt together in a separate bowl until there are no lumps and everything feels unified. Don't skimp on the whisking; you want this to feel luxurious rather than curdled.
- Build the pops:
- Spoon about one to two tablespoons of raspberry puree into the bottom of each mold, filling it roughly a third of the way. This base layer is your foundation, so take a second to make sure it's relatively even.
- Add the coconut layer and swirl:
- Top each mold with the coconut mixture, filling to just below the rim to leave room for expansion. If you want that gorgeous marbled effect, drag a skewer through the layers once or twice—don't overdo it or you'll lose the definition between colors.
- Freeze until solid:
- Insert your sticks into the molds, then slide everything into the freezer for at least four hours, though overnight is better. They're ready when they're rock solid and don't budge when you wiggle a stick.
- Release and serve:
- Run each mold under warm water for about thirty seconds, then gently coax the pop out—you'll feel it loosen. Serve right away before the frozen edges start to weep.
 Save to Pinterest
 There's something quietly magical about watching someone pull one of these from the freezer on a hot day—that moment of pure anticipation before the first bite, the way the pink and white layers catch the light. It's a small thing, but it reminds me that sometimes the best treats are the ones you can make in the time it takes to throw together lunch.
Flavor Variations to Try
The raspberry-coconut combo is my default now, but I've found the structure works beautifully with other fruits—strawberries give you a softer flavor, mixed berries add complexity, and mango creates this tropical sweetness that feels like a vacation in a popsicle. You can also fold whole raspberries into the coconut mixture before freezing for little bursts of tartness that break up the creaminess.
Tropical Twist Option
One day I added shredded coconut to the coconut layer on a whim, and it created this wonderful texture contrast—you get a little chew along with the smooth cream. If you want to go deeper into tropical territory, you could replace part of the raspberry layer with passion fruit or pineapple, though I'd keep the lemon juice to maintain that balancing brightness.
Making and Serving
These are perfect for sitting outside on the porch or bringing to a gathering—they look impressive and taste like you actually tried, which seems to be the sweet spot for entertaining. They also keep beautifully in the freezer for a few weeks, so making a double batch on a mild day means you have treats ready whenever the heat hits again.
- For the prettiest presentation, unmold them directly into hands or onto sticks right before serving so the colors stay vivid and sharp.
- If you're serving at a party, prep them through the freezing step the day before and unmold just before guests arrive.
- Store any extras in a freezer bag separated by parchment so they don't stick together.
 Save to Pinterest
 These pops have quietly become my favorite solution for beating the heat, and they're the kind of recipe that gets better each time you make it. There's real freedom in something this simple that tastes this good.
Recipe FAQs
- → Can I use frozen raspberries?
Yes, frozen raspberries work well and can be blended directly without thawing, maintaining freshness and flavor.
- → What sweeteners are suitable alternatives?
Honey or maple syrup are recommended, with maple syrup being a good vegan-friendly option.
- → How do I achieve a marbled effect?
Gently swirl the raspberry and coconut mixtures with a skewer or knife after layering in the molds.
- → Can I substitute the coconut milk?
Full-fat coconut milk provides creaminess; alternatives might alter texture or flavor significantly.
- → How long should the pops freeze?
Freeze for at least 4 hours or until fully solid to ensure proper texture.
- → Any tips for easy unmolding?
Briefly run the molds under warm water to loosen the pops before gently removing them.